The Page File
1. The average user is best served by LEAVING THE PAGE FILE ALONE. Vista does an excellent job of managing the page file settings for most people.
2. For 99.999% of the configurations on the planet you need a page file. Vista itself wants one and a number of programs out there do too. If you think you can run your machine optimally without a page file you do not understand how Vista (or any NT based OS works).
(Please don’t email me to argue this, I won’t respond. Find a forum to argue about it.)
3. The recommendations below are not designed to give you the highest scores on a synthetic benchmark but to give you the best overall performance for your system (including stability). The size of hard drives today are huge and making the page file a little larger than it "needs" to be hurts nothing and you’re covered if you’re ever doing something that requires more.
One hard drive:
If you only have one hard drive or your other drives are significantly slower than your OS drive.
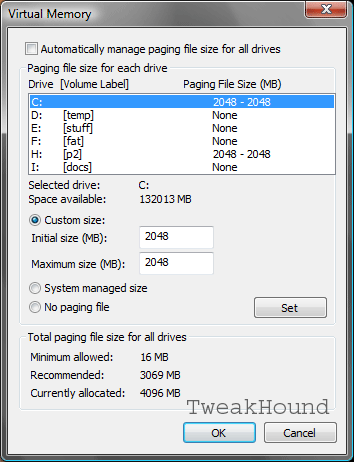
1 - Leave it alone. (recommended)
2 - Make it static. Vista has the ability to resize the page file on the fly if need be (usually it isn't). If the page file is resized and then later returned to normal your disk may become fragmented. (please note I said "disk" not "page file" and "may" not "will") If you have the disk space and you're anal about such things you can adjust the minimum and max to the same setting. The size (min and max) should be whatever the recomended size is in the Virtual Memory window.
Two hard drives:
The second drive should be near as fast or faster than the OS drive or there is no reason to do this.
Make 2 page files, one on the OS drive, one on the first partition of the second drive. The sizes should be at least the size of the amount of memory you have. For example, if you have 2 GB of RAM then 2 page files of 2048 MB. This allows for plenty of space and Vista can choose the drive that is least busy when it needs to access the page file.
To adjust the settings:
Press the Windows + Pause Break keys > in the left pane click on Advanced system settings > click on the Advanced tab > in the Performance section click the Settings... button > click on the Advanced tab . click on the Change... button. Highlight the drive you wish to work with.
SuperFetch (description)
My recommendation: Don't mess with it, period.
I only even list the option in this guide because so many places on the web talk about adjusting on even stopping it. SuperFetch is a highly improved version of XP's prefetch:
"SuperFetch keeps track of which applications you use most and loads this information in RAM so that programs load faster than they would if the hard disk had to be accessed every time. Windows SuperFetch prioritizes the programs you're currently using over background tasks and adapts to the way you work by tracking the programs you use most often and pre-loading these into memory. With SuperFetch, background tasks still run when the computer is idle. However, when the background task is finished, SuperFetch repopulates system memory with the data you were working with before the background task ran. Now, when you return to your desk, your programs will continue to run as efficiently as they did before you left. It is even smart enough to know what day it is in the event you use different applications more often on certain days." Windows Vista - SuperFetch & ReadyBoost
How is this not a good thing???
ReadyBoost
ReadyBoost has been called a "gimmick" by many because they misunderstand what it's supposed to do (see links below). I'll tell you here and now you can increase the responsiveness of Vista by taking advantage of it, I've seen it and felt it first hand. I use it on my desktop but I do not use it on my laptop because it is impractical ( I wonder if anyone will come out with an internal option for laptops?).
ReadyBoost is not:
- a replacement for an adequate amount of system memory
- a replacement for the page file (it works in tandem with it)
How Do You Use It?
Open up Computer > right-click on the drive that you want to use and choose Properties > click the ReadyBoost tab > click Use this device > optionally choose how much of the device to use.
tip - Use a USB port in the back of your computer. Yep, I broke a drive sticking out of the front when I bumped into it (dooh!)
ReadyBoost Spec's & FAQ (mostly from here)
Type of drive - USB 2.0 flash drive (often called a thumb drive) or SD card. See: Grant Gibson's ReadyBoost Compatibility List
Space needed - min. 256 MB, max 4 GB (because ReadyBoost can compact this data this can yield up to 512 MB and 8 GB respectively)
recommended, ratio 1:1 to 2.5:1 (2 GB RAM would be 2 GB - 4 GB of flash drive)
How many drives can I use? - One (man, I would love to see someone come up with a way to RAID a couple of drives for this!)
Security risk? - No, the data is encrypted.
